Buys Gold at 4,600 immediately. Full position. Tight stop at 4,550. By Wednesday, Gold dips to 4,540 before rallying to 5,100. Stopped out on a normal pullback.
Checks the macro first. Growth is slowing, inflation is rising — Gold is in the sweet spot. Mathematical signal confirms timing. Both criteria met. Enters at 4,600 with no stop, rides it to 5,100.
Same signal. Same asset. Same week. One lost money. One made 10%. The difference wasn't luck. It was conviction — and having a system to measure it.
This chapter introduces the most important framework in the entire book: a simple way to grade every potential trade from A to E, so you always know exactly how confident to be and exactly how to manage the position.
The Two Criteria
An asset needs to meet two criteria to receive the highest grade:
1. A mathematical signal — an algorithmic entry signal based on price action, volume, and volatility that says "the probability of a profitable trade is elevated right now." This is the timing component. It tells you when.
2. A discretionary macro decision — your analysis of the economic regime (growth direction, inflation direction, policy stance) that confirms this asset should be performing well. This is the direction component. It tells you what.
The mathematical signal alone can find good entries. But without macro awareness, you might be buying into a headwind. The macro view alone tells you which assets should work, but without precise timing you might enter too early or too late and get shaken out.
When both align, you have a Grade A trade. And Grade A is where the magic happens.
Grade by Grade
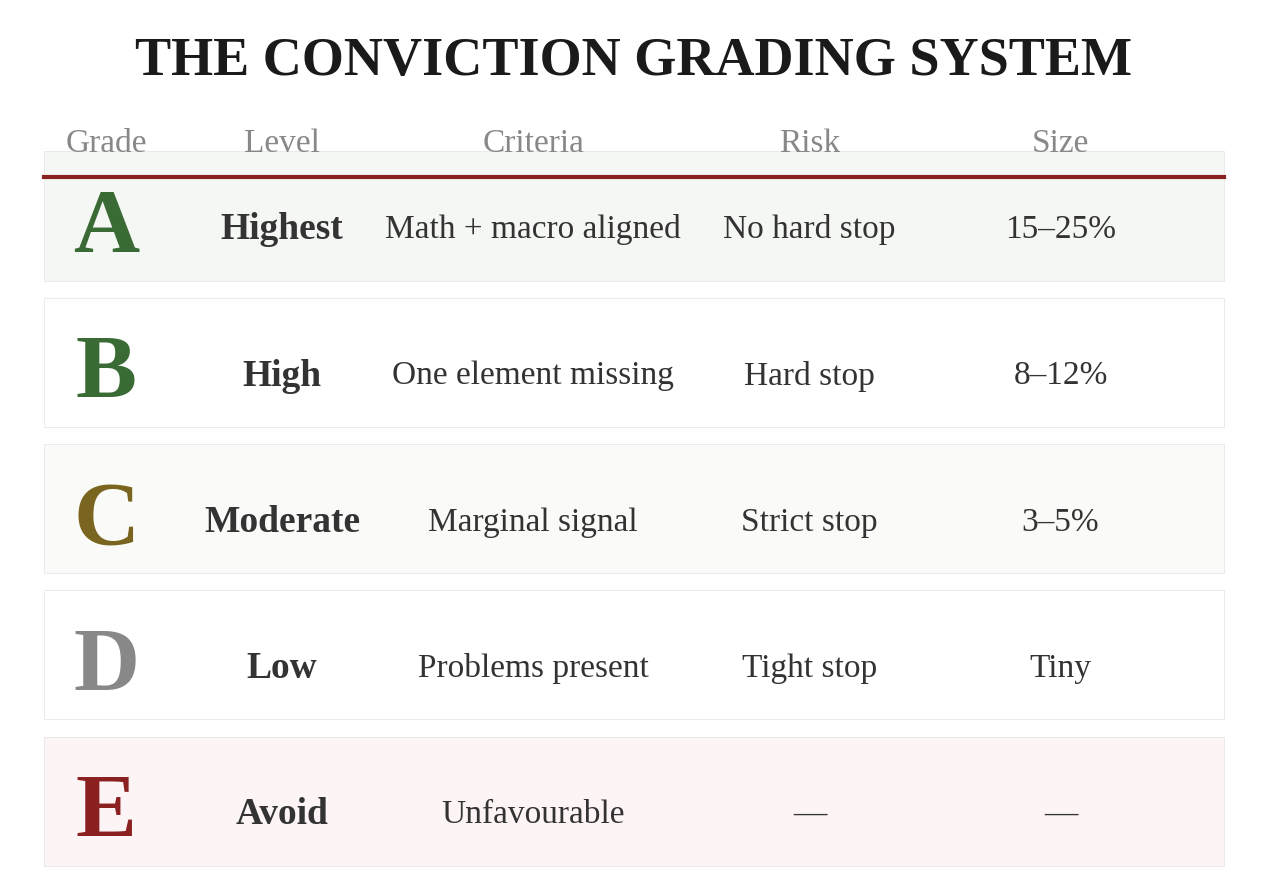
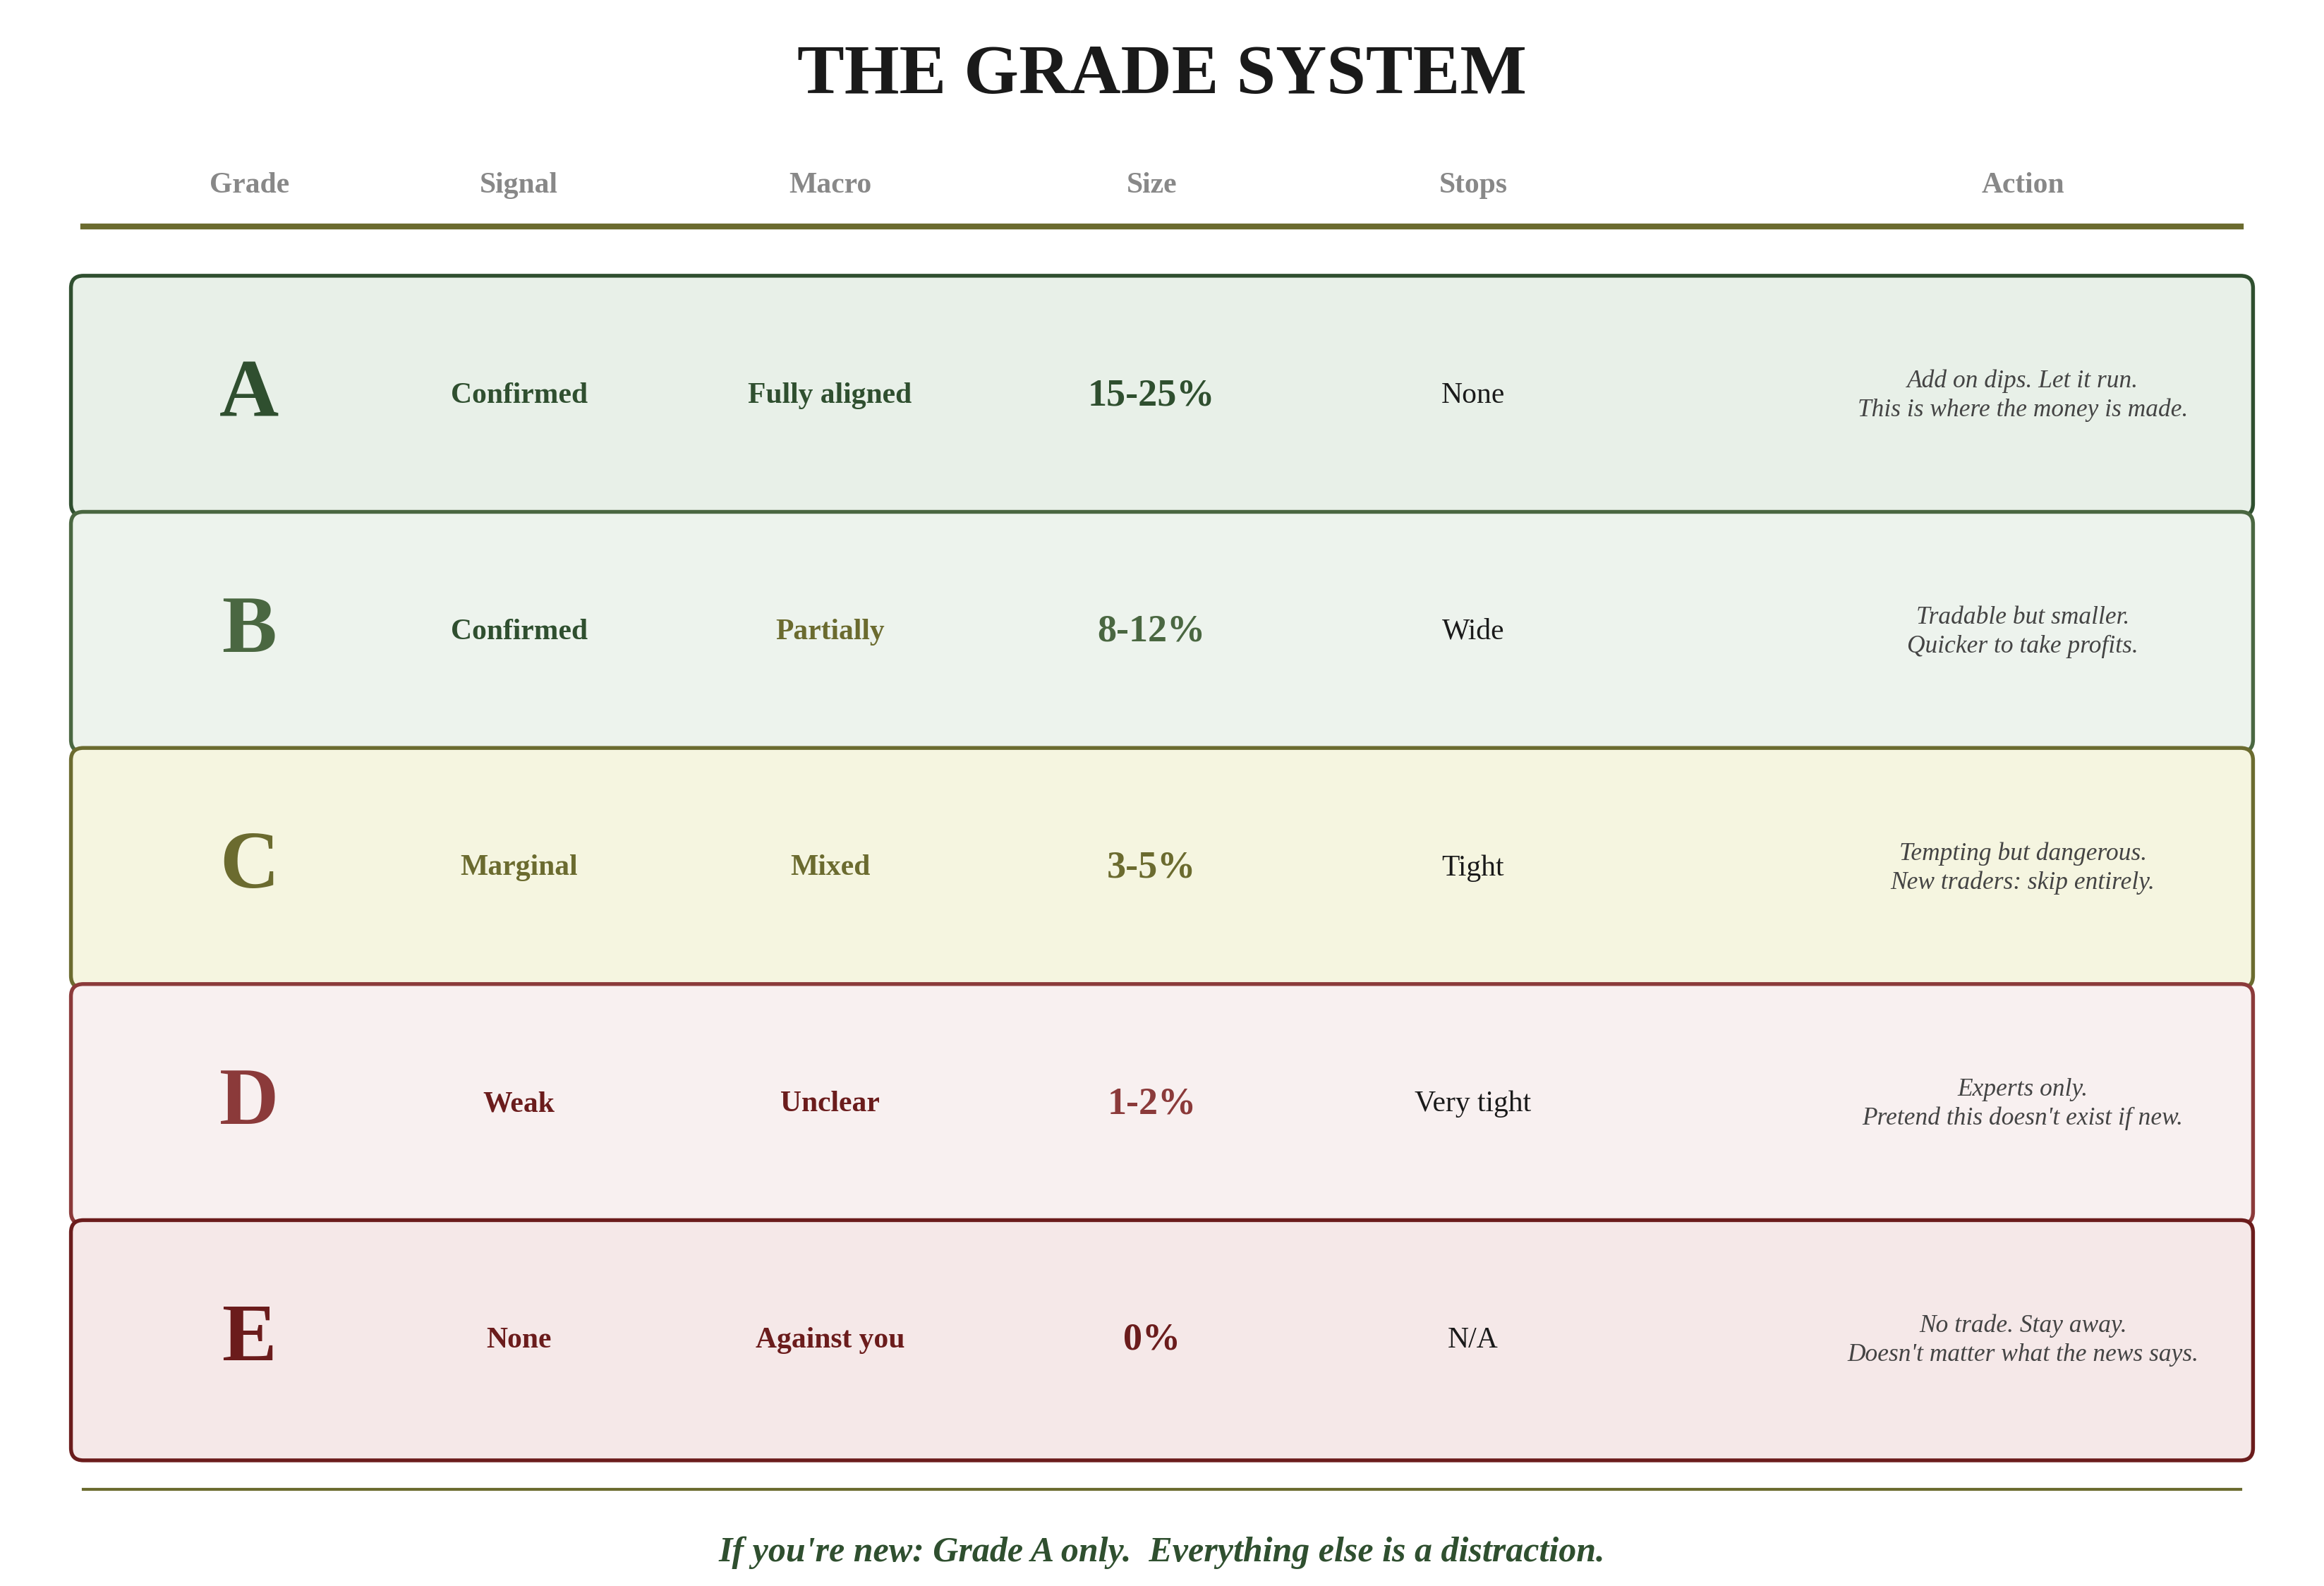
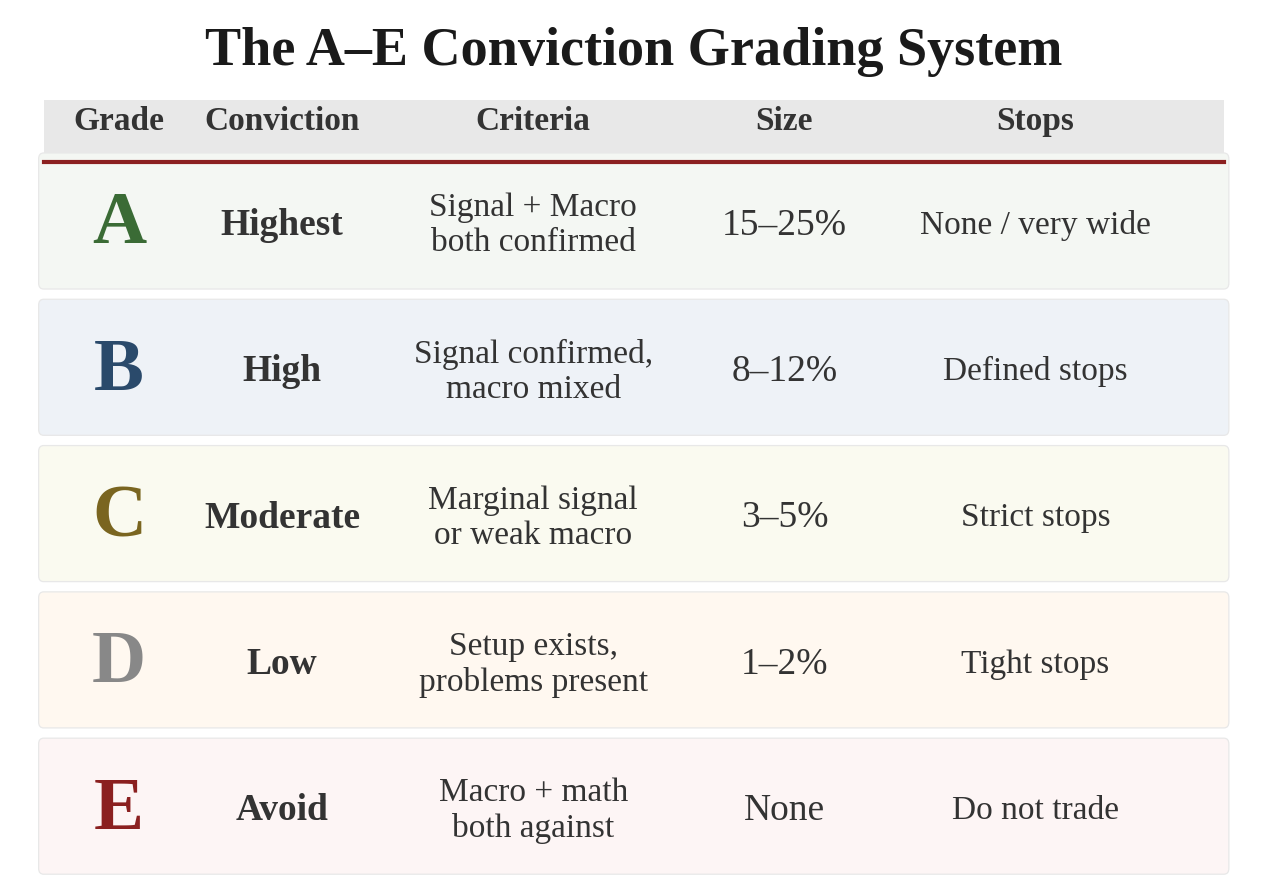
Grade A — Highest Conviction
Both criteria are met. The math says go, and the macro says go. This is your best trade. This is where you put your biggest size and your loosest risk management.
Here's what makes Grade A special: because you have both algorithmic precision on timing AND macro confirmation on direction, you can trade with no stops or very wide stops. Why? Because you don't mind owning the asset. The macro backdrop supports it, the trend is in your favour, and the trade confirmed the timing.
Think about what that means. When you own an asset you genuinely want to own, a normal pullback isn't scary. It's a buying opportunity. You're not white-knuckling through every dip — you're adding to a position you believe in.
Grade A trades are where the vast majority of your profits will come from. Protect them. Nurture them. Don't close them early out of fear.
Grade B — High Conviction
Strong setup but missing one element. Maybe the trade is confirmed but the macro picture is mixed. Or the macro is crystal clear but the math hasn't fully confirmed yet.
Grade B is still very tradable, but you need tighter risk management than Grade A. Use stops. Don't hold as large a position. Be quicker to take profits.
Grade C — Moderate Conviction
Tradable but with notable caveats. The setup might be marginal or the macro support is weak. Reduce position size significantly and use strict risk management.
Grade C trades are where most traders get into trouble. They're just good enough to tempt you, but not good enough to carry a big position. If you're not experienced, skip them entirely.
Grade D — Low Conviction
The setup exists on paper but there are real problems. Maybe the macro is shifting, maybe the asset is choppy, or maybe a major event is incoming that could send it either way.
Grade D trades are for experienced traders only. If you're new, pretend this grade doesn't exist.
Grade E — Avoid
Unfavourable conditions. The macro is against you, the math is against you, or both. Do not trade this asset. It doesn't matter what the news says or what some analyst recommends.
The discipline to avoid Grade E assets is as important as the skill to trade Grade A ones. Every dollar you lose on a bad trade is a dollar you can't deploy on the next Grade A opportunity.
Why Grade A Allows No Stops — The Mathematics of Stops
Every trading course tells you to use stop losses. It's rule number one in most textbooks. "Always protect yourself. Always use a stop."
They're wrong. Or at least, they're only half right. And the half they're missing is the half that costs you the most money.
Let me explain.
To be profitable on any trade, you need two things to be right: timing and direction. You need to enter at roughly the right time, and the asset needs to move in the direction you expected.
Algorithmic signals help enormously with timing. But no setup is perfect. Sometimes the timing is slightly off. The asset dips 2% before running 15% in your direction.
If you had a tight stop loss at 1.5%, that trade — which would have been a massive winner — becomes a loss. Your stop gets hit on a normal pullback, you get taken out, and then you watch the trade go exactly where you expected. If you've been trading for any length of time, you've experienced this. It's infuriating.
Once you have stops involved, your chance of a winning trade is diminished. Full stop. This is a mathematical fact.
A stop introduces a third variable: not just timing and direction, but also your stop not getting hit before the trade works. The tighter the stop, the higher the probability it gets triggered by normal market noise before the real move begins.
For Grade A trades — where both the math and the macro are aligned — the solution is to trade with no stops or very wide stops. You exit when either:
1. The asset breaks its long-term trend, or
2. The asset gets downgraded below Grade A.
That's it. Those are your two exit signals. This is the most mathematically sound way to capture alpha over time.
Why Some Assets Can Never Be Grade A
Not every asset can achieve Grade A status. The reason is simple: to trade without stops, you need to be comfortable owning the asset through volatility. You need to be able to sit through a normal pullback without panicking.
Gold, for example, can absolutely be Grade A. When the macro regime supports it (say, slowing growth and rising inflation), and the mathematical signal confirms timing, you can buy gold and hold through dips because the fundamental case is rock solid. You don't mind owning gold.
Strong, fundamentally sound stocks can be Grade A. If the company is dominant, the macro supports the sector, and the math confirms the entry — you can hold through a 5% dip because you believe in the asset.
But something like Bitcoin, for instance, is much harder to make Grade A. Its volatility is so extreme that holding through a "normal pullback" might mean sitting through a 20–30% drawdown. For most people, that's not realistic without stops. So Bitcoin might frequently be Grade B or C — tradable with tighter risk management, but not something you can hold with the same conviction as gold or a blue-chip stock.
Don't try to force Grade A onto an asset that doesn't deserve it. Be honest about what you can hold through. A forced Grade A on a volatile asset is a Grade C trade with too much size — and that's a recipe for disaster.
The Math of Grade A Trading
Let's quantify the power of this approach.
Depending on market conditions, Grade A opportunities can be rare in some months and plentiful in others. In quiet markets with unclear macro direction, you might only get 1–2 Grade A trades. In trending markets with clear macro support, you might get 5–6. You can see example signals to understand how these grades look in practice.
Let's be conservative: 3 Grade A trades per month.
If each trade averages a 3% profit — which is realistic when you're holding with conviction, adding on dips, and not getting stopped out prematurely — that's 9% per month.
9% per month compounded is over 100% per year. That demolishes hedge fund returns. That destroys the S&P 500's long-term average. That beats what market makers, institutional traders, and the vast majority of professionals achieve.
And it's done with just 3 trades per month. Not 30. Not 300. Three.
Now, I'm not going to pretend this is easy. It requires real discipline. It means watching the market for days or weeks without trading because there's no Grade A opportunity. It means watching other people make money on trades you deliberately avoided because they didn't meet your criteria. It means being comfortable doing nothing while everyone around you is overtrading.
But the math is on your side. And math, unlike emotions, doesn't lie.
If You're a New Trader
If you remember one thing from this chapter: trade Grade A only. If you're new, don't even look at Grade B, C, or D. Size appropriately, manage as described, and resist the temptation to trade more. To read the complete system at your own pace, download the full PDF — all 240 pages, free.
Patience is a strategy.
Next, we'll apply these grades in practice — looking at how multi-asset analysis lets you scan across markets to find the highest-conviction opportunities.
- 1.Grade A trades (both signal and macro aligned) get the biggest size, widest stops, and generate the majority of your profits.
- 2.Grade E means avoid — the discipline to skip bad trades is as valuable as the skill to find good ones.
- 3.If you're new, trade Grade A only. Everything else is a distraction until you have consistent results.
This content is for educational purposes only and does not constitute investment advice. Trading and investing involve substantial risk of loss. Past performance is not indicative of future results. Always do your own research and consider seeking professional guidance before making financial decisions.