You've found a Grade A setup. The macro regime supports it. The setup is live. Now comes the question that separates the amateurs from the professionals:
How much do you buy?
This is where most traders completely blow it. They either go all-in on one idea and pray, or they spread their money so thin across 20 positions that even winners don't make a difference.
Position sizing isn't sexy. Nobody makes TikTok videos about it. But it is the single biggest determinant of whether you make money or go broke. Two traders can take the exact same trades at the exact same time and have different outcomes — purely based on how they size their positions.
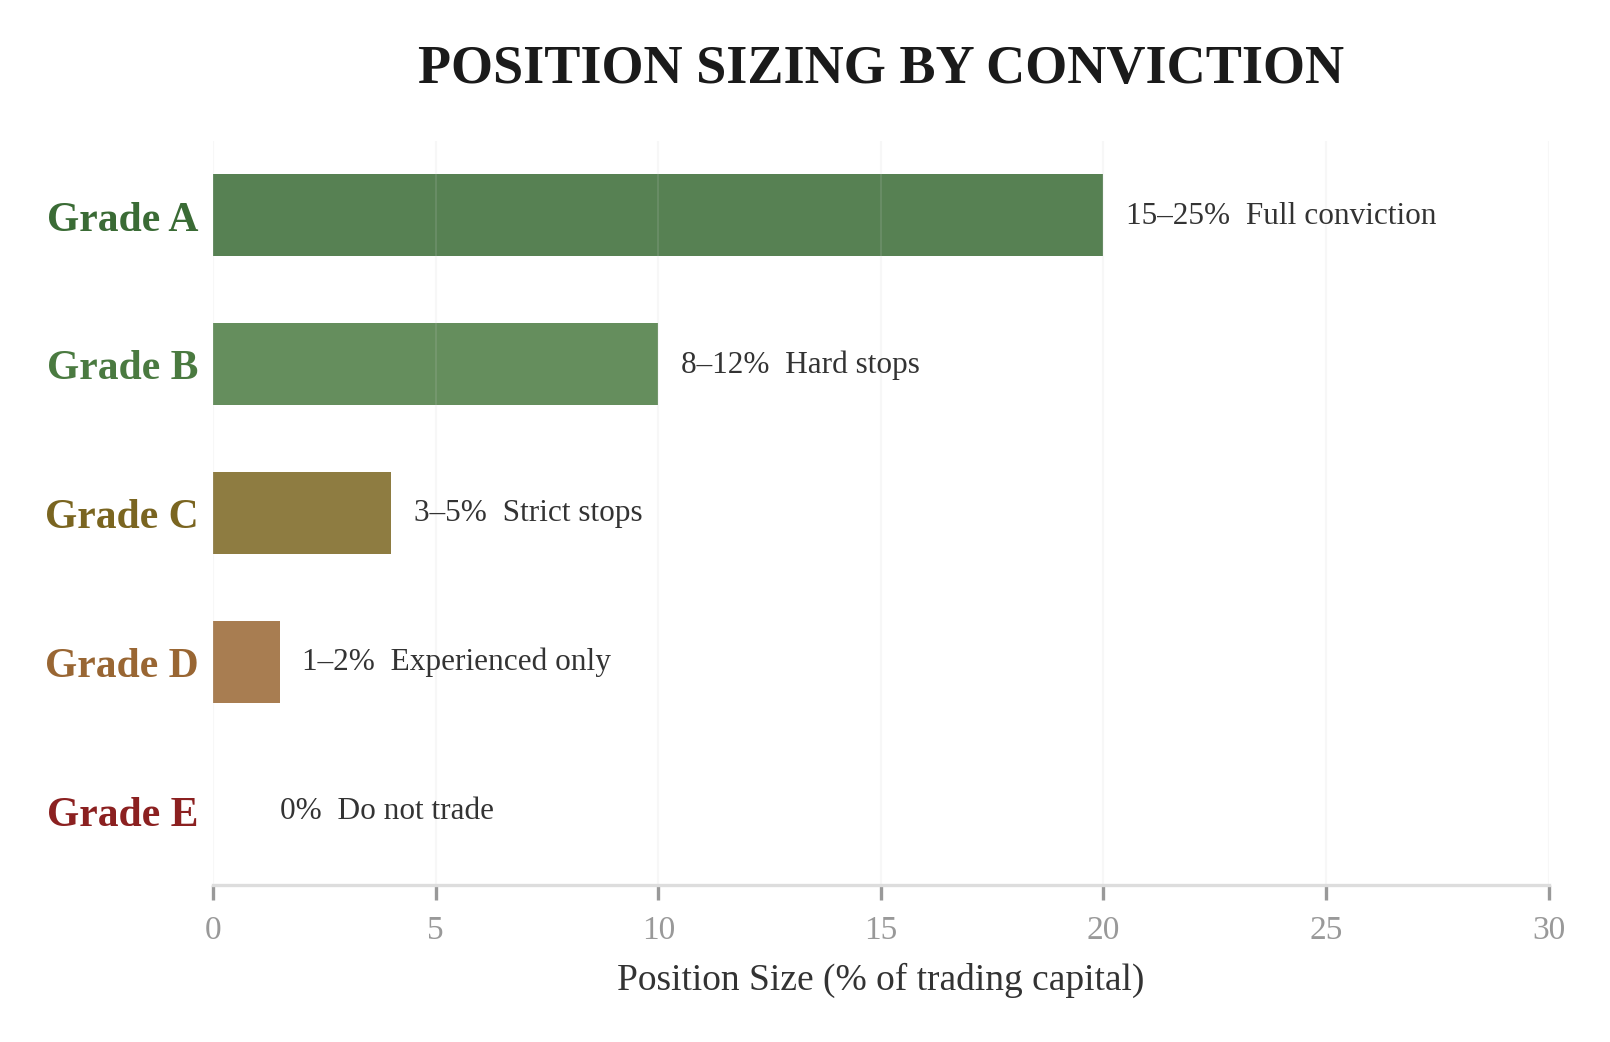
Size to Your Conviction
The grade tells you how much to bet. It's that simple.
Your Grade A trades get the biggest allocations. Grade B gets moderate. Grade C gets small. Grade D is for experienced traders only. Grade E you don't touch. No exceptions.
What does "full size" mean in practice? That depends on your total capital and risk tolerance. For most traders, a full-size position might be 5–10% of their portfolio. For more aggressive traders with strong conviction, it could be higher. The point is that your Grade A allocation should be meaningfully larger than your Grade B, which should be larger than your Grade C.
This creates a natural portfolio that is weighted toward your best ideas. Over time, your profits will be dominated by Grade A trades because they're bigger and they run longer. Your losses will be small because your lower-grade trades are smaller and cut faster.
Build in Increments
Here's a mistake almost every new trader makes: they see a setup, get excited, and buy their entire position in one shot. All in. Day one. Full size.
Then the asset dips 2% the next day — a completely normal, healthy pullback — and they're sitting on a loss with no room to manoeuvre. They've already used all their ammunition. They can't add at a better price. They can only sit there and sweat.
The smarter approach: build into positions over multiple days as the trade confirms your thesis. Look at the stock example from the previous chapter. Day 1, you bought 100 shares. Day 2, you added 50. By the time the move arrived on Day 4, you had 150 shares at a strong average price.
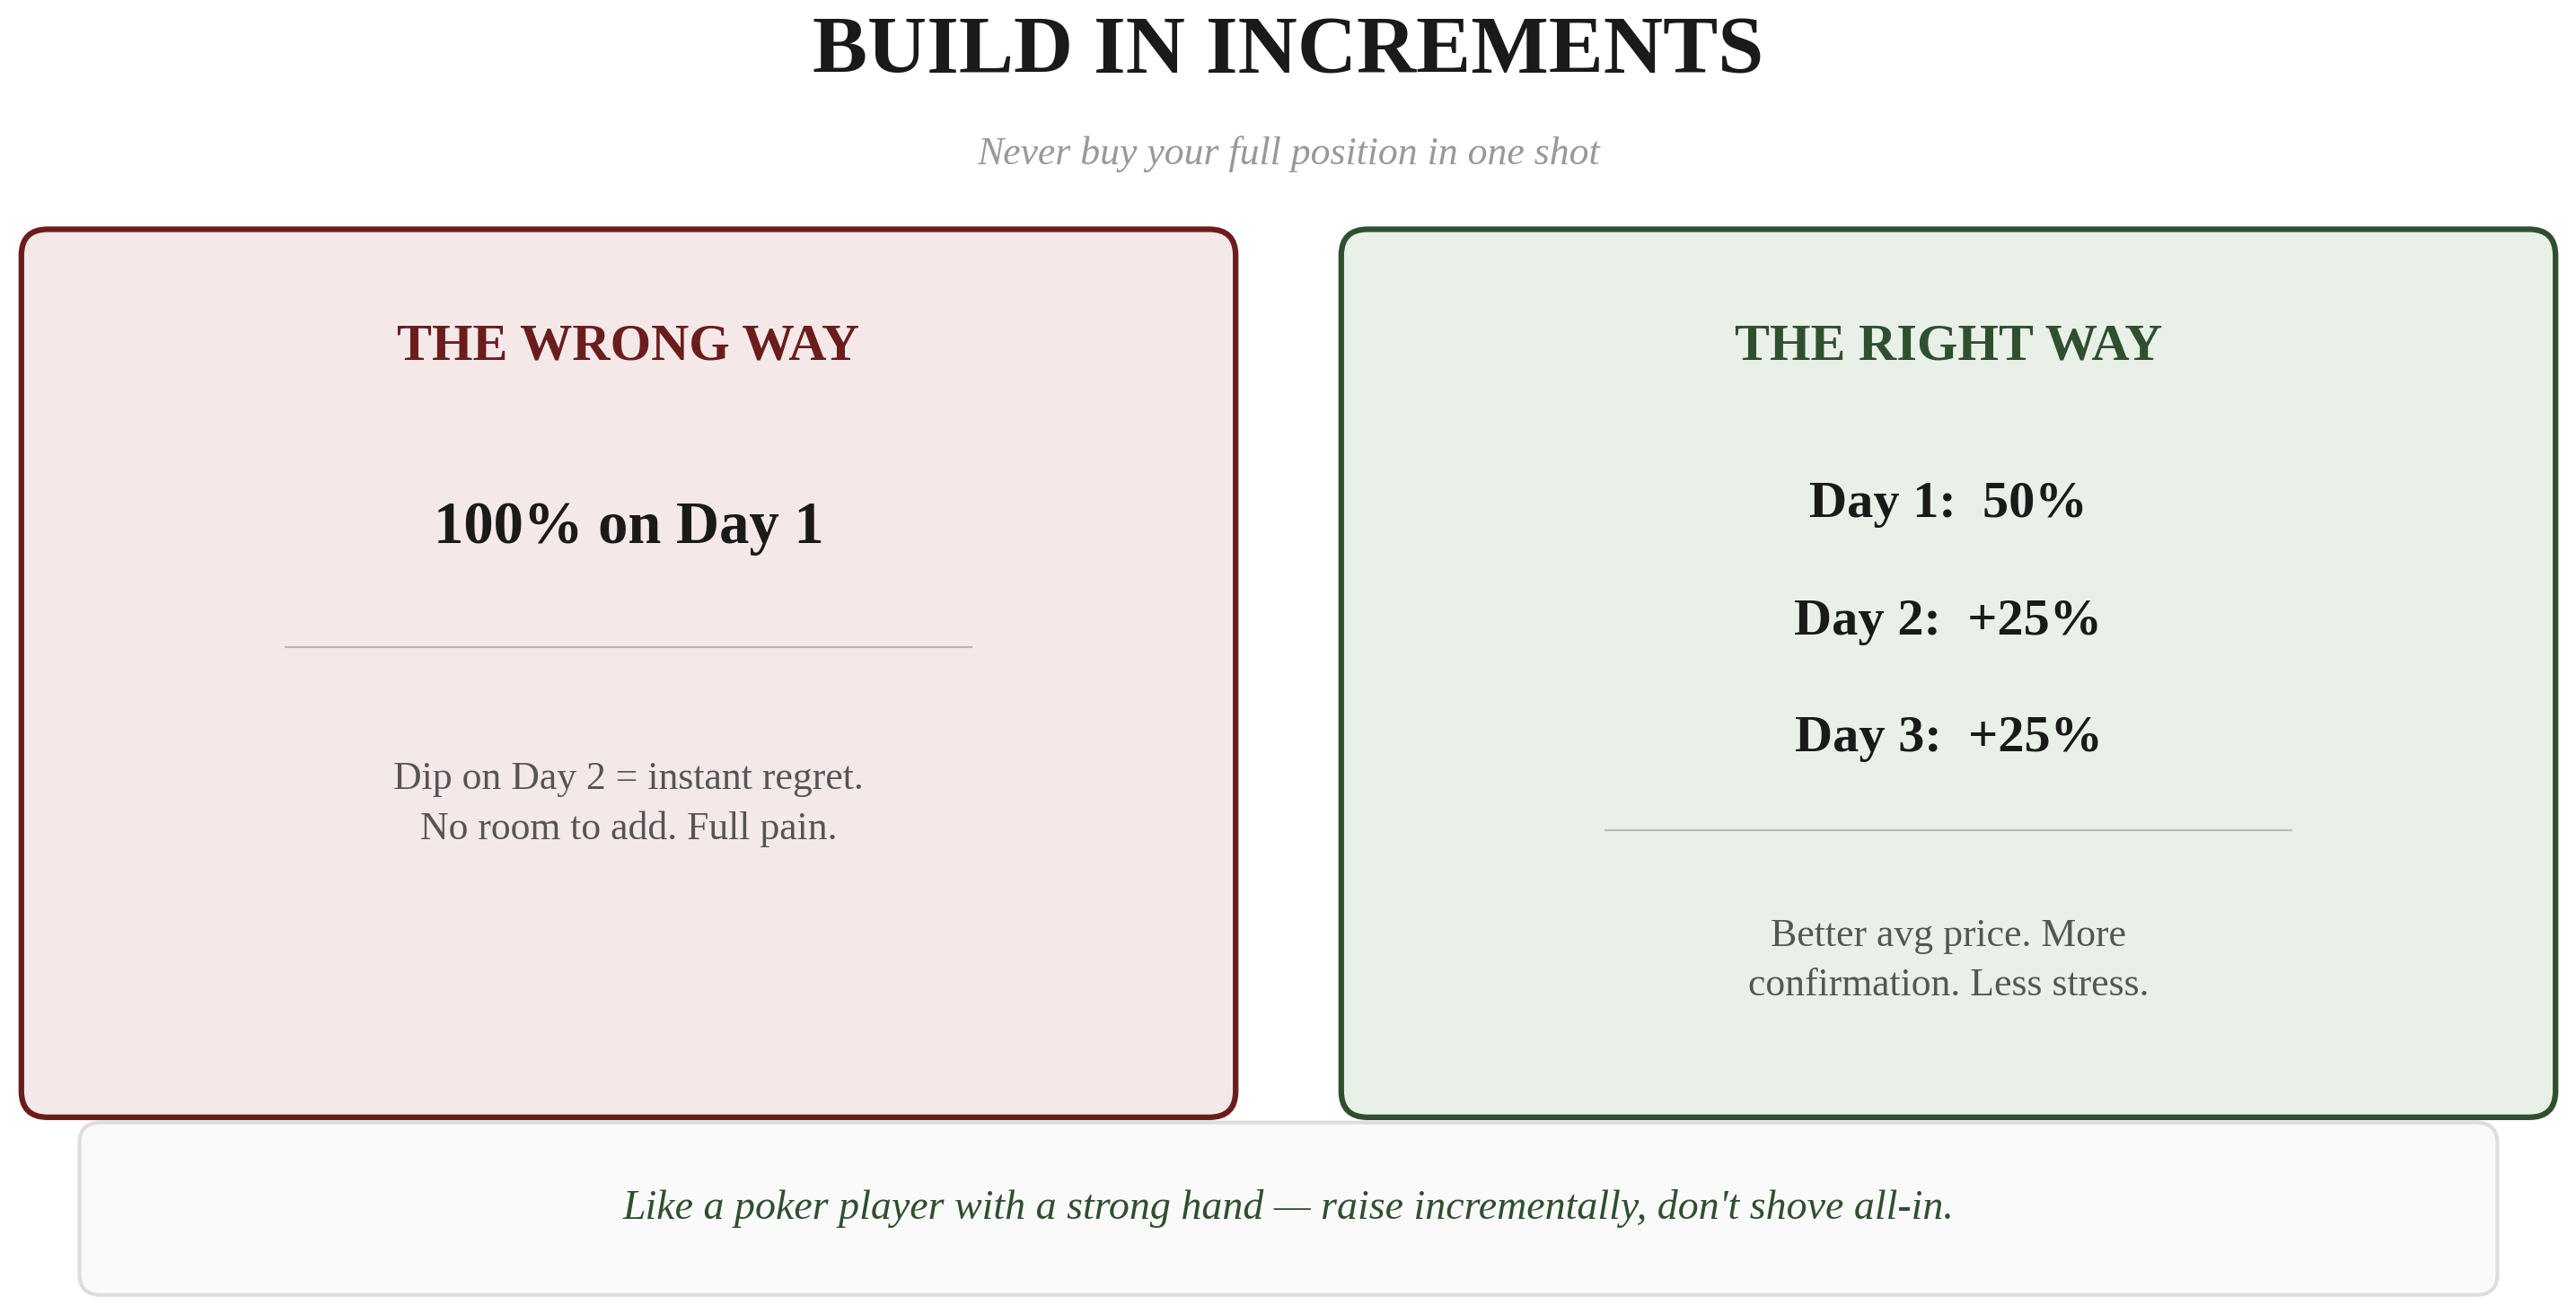
Why does this work?
- Better average price. If the asset dips after your first entry (which happens all the time), your subsequent entries are at lower prices. Your average cost ends up better than if you'd gone all-in at the first signal.
- Confirmation. Each day that the entry level holds and the grade stays intact is additional confirmation that the trade is working. You're increasing your bet as your confidence increases.
- Psychological comfort. Starting with a partial position means you're not fully committed on Day 1 when uncertainty is highest. This makes it easier to stick with the process rather than panic-selling on the first dip.
Think of it like a poker player who's been dealt a strong hand. They don't shove all their chips in immediately — that scares everyone away and wins a small pot. They bet incrementally, drawing more money in as the hand confirms their read.
When to Get Out
Getting in is easy. Everyone can buy something. Getting out — knowing when to take profit, when to cut a loss, and when to hold steady — is the hard part. And it's the part most people get disastrously wrong.
For Grade A Trades
1. The asset breaks its long-term trend (confirmed lower highs and lower lows where there used to be higher highs and higher lows).
2. The asset gets downgraded below Grade A.
Two triggers. Nothing else. As long as it's Grade A and the trend is intact, you hold.
For Grade B and Below
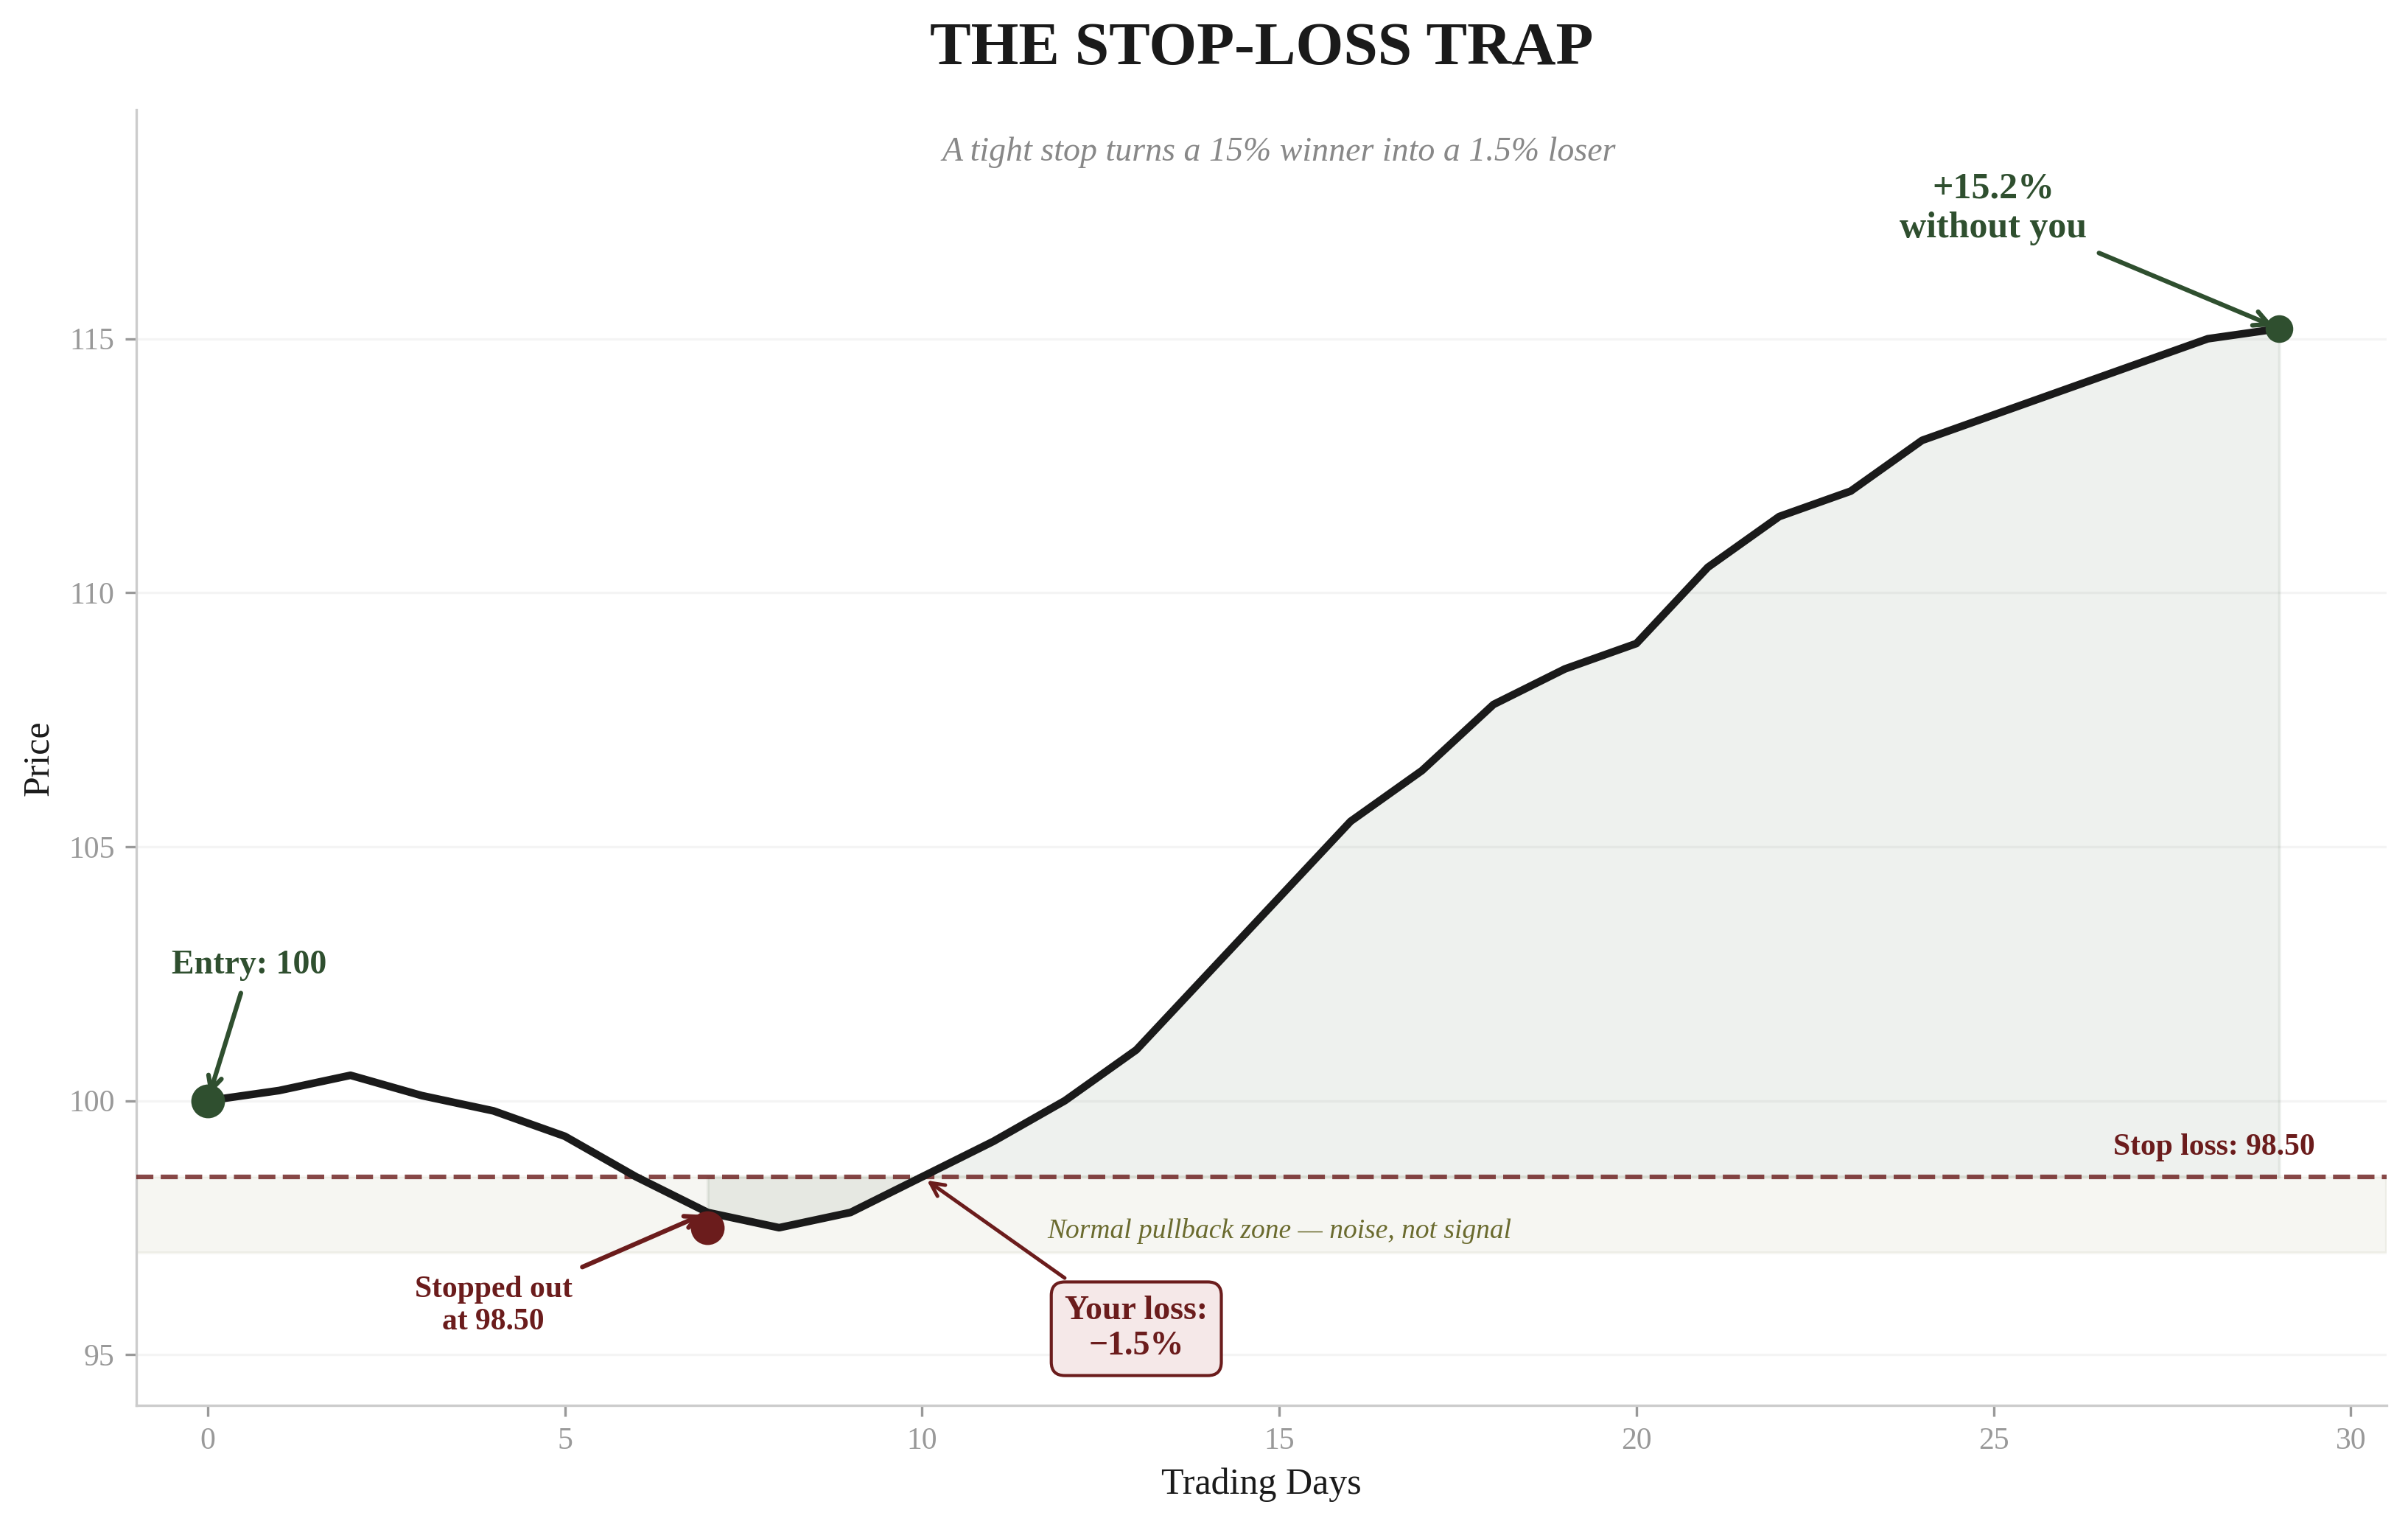
Use defined exit signals more aggressively. Set hard stops before you enter — not trailing stops, hard stops at a level that would invalidate your thesis. If the trade isn't working within your timeframe, cut it. Don't give Grade B and C trades the patience you'd give Grade A.
The General Rule
If the math or the macro changes, you get out. No negotiating with yourself. No "maybe it'll come back." No "I'll just give it one more day." Out.
The market doesn't care about your feelings. It doesn't know what price you bought at. It doesn't know that you need it to come back to breakeven so you can exit without a loss. The market does what it does. Your job is to respond to reality, not to hope for a different one.
I'll tell you what "one more day" looks like. A trader buys a stock at 200. It drops to 190. They say, "I'll give it one more day." It drops to 185. "One more day." 178. "It's got to bounce." 165. Now they're down 17% and the loss is too painful to take, so they hold. It goes to 140. Then 120. A 40% loss that started as a 5% loss.
The Drawdown Math — Why Protection Is Everything
Let's say you start with £100,000. You have a rough few months and lose 50%. You're at £50,000. Now, how much do you need to make to get back to £100,000?
If you said 50%, you'd be wrong. You need 100%. You need to double your remaining money to get back to where you started. Not to profit. to break even.
This is the brutal asymmetry of losses. And most traders don't understand it until it's too late.
| You Lose | You Need to Recover | Reality Check |
|---|---|---|
| −10% | +11% | Achievable in weeks |
| −20% | +25% | A few good months |
| −30% | +43% | Challenging but possible |
| −50% | +100% | You need to double your money |
| −70% | +233% | Extremely difficult |
| −80% | +400% | Virtually impossible |
| −90% | +900% | Fantasy |
This is why position sizing and risk management isn't just important — it's everything. Every trade you take, your first question should be: "How much can I lose?" Not "How much can I make?"
Protecting your capital is job number one. Without it, nothing else in this book matters.
Never Short
There's a piece of advice that goes against almost everything you'll hear in trading communities: don't short. Ever.
The market goes up roughly two out of every three years. That means if you're short, the odds are already stacked against you the vast majority of the time. Shorting is swimming against the current.

Yes, there are times when markets crash and shorts make a fortune. But those times are rare, unpredictable, and the timing has to be nearly perfect. For every trader who made money shorting the 2008 crash, there are hundreds who tried to short the same market in 2006, 2007, or early 2008 and got wiped out waiting for the crash to arrive.
Here's what happens when you try to short. You notice a stock that's been running up and you think it's overvalued. You short it at 150. It goes to 160. You hold. It goes to 175. Now you're sweating. It goes to 200. You're down 33% and facing a margin call. You cover at 195 for a massive loss. Six months later, the stock finally drops to 130 — well below your original entry — but you're not in the trade anymore because you got destroyed on the way up.
It is way easier and way less stressful to always be long. If something is going down, don't trade it. Move to the next Grade A opportunity in something that's going up. There's always something going up somewhere in the world.
Your edge isn't in calling the top. Your edge is in riding the trend and getting out when the grade drops.
The 1% Concept
Here's a number that should be tattooed on every trader's forearm: 1–2%. That's the maximum you should ever risk on any single trade. If the trade goes to zero, you've lost 1–2% of your portfolio. Painful, but survivable. You live to fight another day.
For Grade A trades with no stops, this is managed through position sizing. If you're trading without a stop, your position needs to be small enough that even a significant adverse move doesn't destroy more than 1–2% of your capital.
For Grade B and C trades with defined stops, the math is simpler. If your stop is 3% below your entry and you want to risk 1% of your portfolio, then your position size should be roughly 33% of your portfolio (1% / 3% = 33%).

This arithmetic forces you to trade smaller positions on lower-conviction trades and larger positions on higher-conviction ones. Which is exactly what you want.
The Bottom Line
Position sizing and risk management aren't the exciting parts of trading. Nobody starts trading because they love calculating maximum drawdown scenarios. But this is the stuff that keeps you in the game long enough for your edge to compound. To see how disciplined risk management translates into real returns, review our verified performance.
Size to your conviction. Grade A gets the biggest position. Grade E gets nothing. Our market products include conviction grades for every trade across six markets.
Build in increments. Never buy your full position in one shot.
Protect your capital like your financial life depends on it — because it does.
Exit when the grade drops or the trend breaks, and don't argue with reality.
Stay long, stay patient, and let the Grade A opportunities do the heavy lifting.
With Part One complete — macro regimes, conviction grades, execution, and risk management — we now move to Part Two: the foundations that make everything else work.
- 1.Never risk more than 1-2% of capital on any single trade — this ensures even catastrophic outcomes are survivable.
- 2.Build positions incrementally over 2-3 days rather than going all-in on Day 1.
- 3.The drawdown math is brutal: a 50% loss requires a 100% gain to break even. Protect capital above all else.
This content is for educational purposes only and does not constitute investment advice. Trading and investing involve substantial risk of loss. Past performance is not indicative of future results. Always do your own research and consider seeking professional guidance before making financial decisions.